1. Nacos Introduction
Nacos is the acronym for ‘Dynamic Naming and Configuration Service’,an easy-to-use dynamic service discovery, configuration and service management platform for building cloud native applications.
Nacos is committed to help you discover, configure, and manage your microservices. It provides a set of simple and useful features enabling you to realize dynamic service discovery, service configuration, service metadata and traffic management.
Nacos makes it easier and faster to construct, deliver and manage your microservices platform. It is the infrastructure that supports a service-centered modern application architecture with a microservices or cloud-native approach.
1.1 Basic Architecture
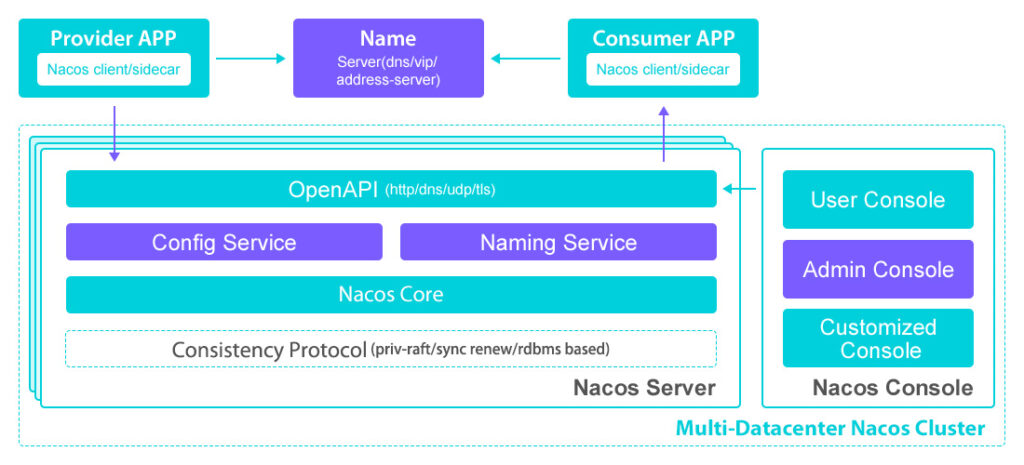
1.2 Key Features
1.2.1. Service:
Service Registry:
Implement a service registry, which is a database of services, their instances and their locations. Service instances are registered with the service registry on startup and deregistered on shutdown. Client of the service and/or routers query the service registry to find the available instances of a service. A service registry might invoke a service instance’s health check API to verify that it is able to handle requests.
Service Metadata:
Descriptive information of Nacos data (configurations and services), such as service versions, weights, disaster recovery strategies, load balancing policies, authentication configurations, and various custom labels (labels). Ranging from service-level, cluster-level, to instance- level metadata.
Service Health Check:
Inspects the health of instances attached to a service to determine if they can provide service. Based on the check results, instances are marked healthy or unhealthy. When requesting resolution for a service, unhealthy instances are not returned to clients.
1.2.2. Configuration
Configuration Management:
In the data center, all configuration-related activities such as editing, storage, distribution, change management, history version management, and change audit are collectively referred to as configuration management.
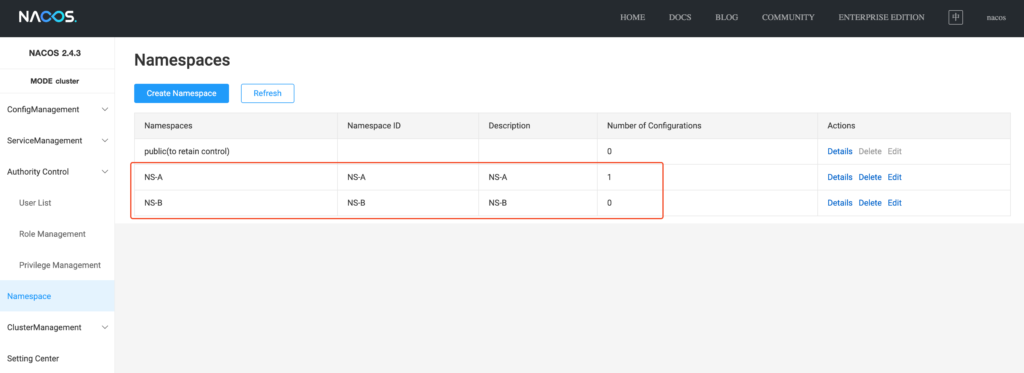
1.2.3. Namespace
For tenant-level configuration isolation. Different namespaces can contain identical Group or Data ID configurations. A common scenario for namespaces is the separation of resources (like configurations, services) between development/test/production environments.
1.2.4. Other Details
| Opensource | Yes |
| Enterprise Version | Available |
| Cloud Support | Alibaba Cloud and *Other |
| Docker | Yes, from nacos version > 2.3 |
| Kubernetes | Yes, from nacos version > 2.3 |
| Linux/Unix/Mac/Windows | All Platforms |
| Official Language Support | Java, Golang, Python, C++, NodeJS, C#, Rust Other languages can use Nacos Open API |
2. Nacos Installation
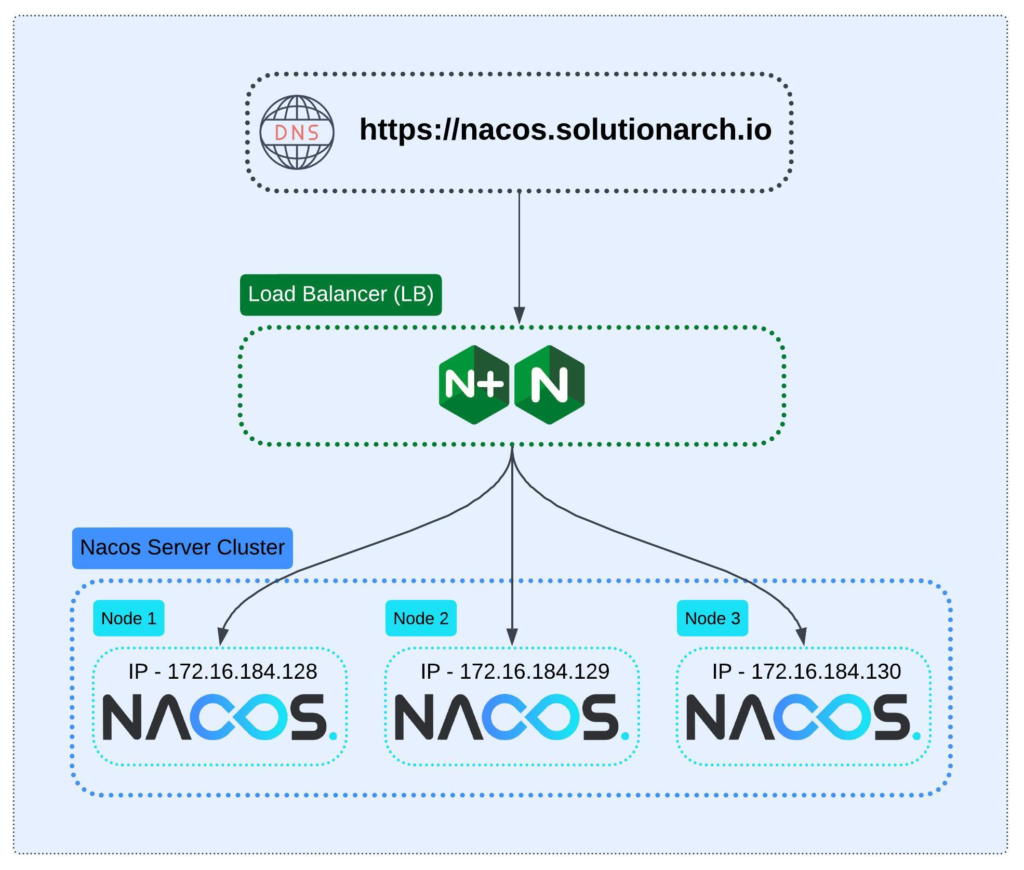
2.1 Nacos Cluster Architecture Diagram
2.2 Nacos Install in Linux/Mac/Windows
2.2.1. Prerequisite:
Download the latest version of nacos from official website.
| JDK/JRE | Java 8 and above, Install and set JAVA_HOME |
| CPU | 1 core or higher, 64-bit CPU support |
| Memory | 2G or more |
| Hard disk | No minimum requirement, adjust according to log retention |
| Operating system | Linux, Mac OS X, Windows |
| Database | MySQL (recommended) or Derby Database |
2.2.2. Cluster – Installation Steps:
Navigate to the Nacos installation folder and then use the command below to run it in standalone mode.
Step-1: Rename cluster.conf.example to cluster.conf in the conf/ folder, and update it with the IP addresses and PORT numbers of all your nodes.
application.properties nacos.inetutils.prefer-hostname-over-ip=true
nacos.inetutils.ip-address=<Local IP>
#IP:PORT
172.16.184.128:8848
172.16.184.129:8848
172.16.184.130:8848Step-2: Manually create a database for Nacos and initialize it by executing the DDL script located at nacos/conf/mysql-schema.sql
Step-3: Uncomment database properties and update your database IP and DB details in application.properties
### Deprecated configuration property, it is recommended to use `spring.sql.init.platform` replaced.
spring.sql.init.platform=mysql

### Count of DB:
db.num=1

### Connect URL of DB:
db.url.0=jdbc:mysql://<IP>:<PORT>/<Database>?characterEncoding=utf8&connectTimeout=1000&socketTimeout=3000&autoReconnect=true&useUnicode=true&useSSL=false&serverTimezone=Asia/Shanghai&allowPublicKeyRetrieval=true
db.user.0=<db-user>
db.password.0=<db-password>Step-4: Enable authentication in conf/application.properties file.
These below properties must remain consistent across all nodes.
nacos.core.auth.enabled=true
nacos.core.auth.system.type=nacos
nacos.core.auth.plugin.nacos.token.secret.key=<its custom Base64 string>
## The two properties serve as a whitelist for authentication and are used to identify requests from other servers.
nacos.core.auth.server.identity.key=<custom key>
nacos.core.auth.server.identity.value=<custom value>Step-5: We are good to start our nacos cluster service with bash commands.
Start Nacos Standalone mode: (Development purpose only)
## for linux/unix/mac
sh bin/startup.sh -m standalone

## for windows
bin/startup.cmd -m standaloneStart Nacos Cluster mode: (Development purpose only)
## for linux/unix/mac
sh bin/startup.sh

## for windows
bin/startup.cmdShutdown Nacos Server (standalone/cluster)
## for linux/unix/mac
sh bin/shutdown.sh

## for windows
bin/shutdown.cmd2.2.3 Cluster – Load Balancer Config
To access the Nacos console or APIs, a load balancer needs to be configured between the Nacos cluster nodes. I recommend using Nginx as the load balancer. If Nginx is not already installed, please refer to the Nginx Installation Guide.
Add cluster details in /etc/nginx/sites-available/default file.
upstream nacos-cluster {
   server 172.16.184.128:8848;
   server 172.16.184.129:8848;
   server 172.16.184.130:8848 backup;
}

# This server accepts all traffic to port 80 and passes it to the upstream.
# Notice that the upstream name and the proxy_pass need to match.

server {
   listen 80;

   location / {
        proxy_pass http://nacos-cluster;
        proxy_set_header Host $host;
        proxy_set_header X-Real-IP $remote_addr;
        proxy_set_header X-Forwarded-For $proxy_add_x_forwarded_for;
        proxy_connect_timeout 5s;
   }
}I am using the default round-robin load balancing method, with the third node configured as a backup for failover.
2.2.4. Verify Nacos:
It’s time to access the Nacos web portal. Open your browser and enter the host or IP address. You should then see the Nacos web console.
Syntax: http://<IP>:<PORT>/nacos
Example: http://nacos.solutionarch.io/nacos
After launch it, set admin password, then navigate to Cluster Management >> Cluster Node List there we can see all the cluster are up and running.

Debug Tip: The most common mistake is not enabling UFW firewall ports. For other issues, check the logs in the
logs/folder.
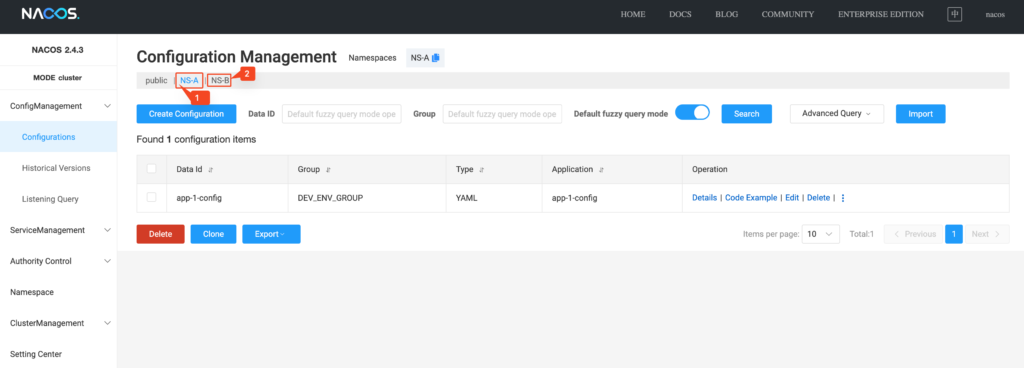
3. Nacos Usage
3.1. Nacos Web Console
In the web console left-side menu, you can see the following sections:
- ConfigManagement – Create service specific properties and organize them using separate namespaces for different projects or applications.
- ServiceManagement – Register services manually or enable auto-registration; all registered services are displayed here.
- Authority Control – Manage user access and permissions effectively.
- User List – View the list of users with assigned access rights.
- Role Management – Create and manage custom roles tailored to specific requirements.
- Privilege Management – Grant access permissions (read, write, or both) at the user and namespace level.
- Namespace – Use namespaces to segregate configurations and services by project or application for better organization.
- ClusterManagement – View details of configured clusters, including their status and health.
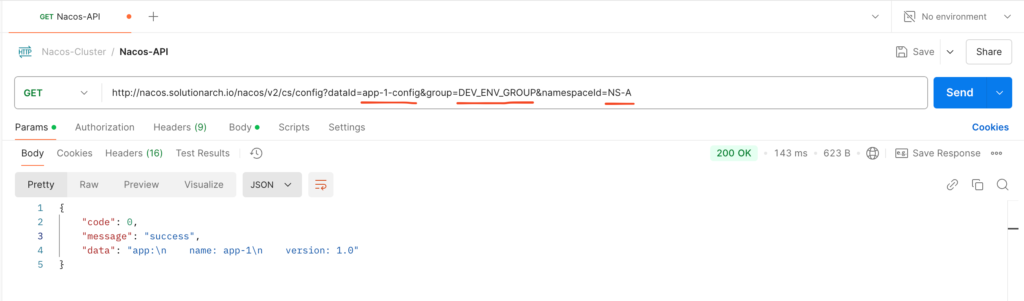
3.2. Nacos API
Same details we can access through Nacos Open API as well.
API is secured, so user credentials you can pass it through form-data request.
Conclusion:
By following this guide, you’ve successfully set up Nacos, configured a cluster for high availability, and prepared it for production-grade usage. With its robust features like dynamic configuration management, service discovery, and namespace isolation, Nacos becomes a reliable backbone for your microservices architecture.
Remember to secure your setup with proper firewall rules, SSL/TLS certificates, and access controls. With these best practices, your Nacos deployment is well-equipped to handle the demands of a scalable, production-grade environment. Happy scaling your microservices with Nacos!